Admin Page Display Options
SettingsACCOUNT SETTINGS- Control the admin password for logging in to your admin page and the E-mail address to retrieve your admin password.
PAYMENT SETTINGS- Control the methods of customer payments on your site.
CART CHECKOUT SETTINGS- Customize the behavior of your site during the order checkout process.
COUNTRY SETTINGS- Use this page to select the countries that are available in the country drop-down menus throughout your SiteLINK store. This applies to new customers and prospects only.
STATE SETTINGS- Set state restrictions for orders by choosing which states will be available for selection in the state drop-down menus throughout your SiteLINK store. This only applies to new customers and prospects.
PAGE SETTINGS- Control the options for the Left Side Navigation Page.
CUSTOMER MANAGEMENT SETTINGS- Change how the site records customer information.
PRODUCT SEARCH SETTINGS- Select the information that will be utilized for a product search.
PRODUCT DISPLAY SETTINGS- Customize how products are listed and the information displayed within a Product Page.
HOME PAGE FEATURED PRODUCTS SETTINGS- Select an existing department to act as a Featured Products product listing to be displayed on the home page.
DEPARTMENTS- Change how departments are displayed in the Department Page.
STORE STATUS- Choose to open or close the store for business. A closed store will not allow new orders to be entered.
Please Note: Any shoppers that are currently on the site when the store is closed will be allowed to complete their orders.
ACTIVE SHOPPERS- This number represents the current number of shoppers in your store that have an item in the cart and have reached the customer information page. Once an order has been completed or the session has expired (due to 20 minutes of inactivity or if the customer closes their browser) that number decreases. For shoppers that add an item to their cart and enter their customer information but do not complete their order, please review the "View Abandoned Cart Customers" to see that information.
LOGOUT- Click this link to exit out of the Admin page and end your session, preventing other users from making changes without logging in.
back to top
Design
COLOR/BUTTONS SETTINGS- Customize the of the background and checkout
buttons for the site.
TOP NAVIGATION STYLE- Change the look of the Top Navigation section
of the site.
SIDE NAVIGATION STYLE- Edit the style of the Left Side Navigation
section of the site.
ALL PAGE STYLE- Change the Color and Style of the Product Listing
pages and the individual Product Pages.
MAINTAIN STORE TEXT PAGES- Edit the titles and content of the miscellaneous
pages on the site.
back to top
Marketing/SEO
MAINTAIN META TAGS- View a list of the pages on the site
and view which of these pages contain Meta
Tags then add the tags to each page as required.
MAINTAIN ROBOTS.TXT FILE- Gives you control over this optional file that resides
in the root folder of the website and informs a search engine robot/spider/crawler of what pages should or should not be indexed.
GENERATE GOOGLE/YAHOO SITEMAP- This function enables you to create
a "Map" of your site that consists of the details necessary to allow Google
and Yahoo to search your site more efficiently. The sitemap will utilize
the Meta Tag data defined in your Stock Items and the Maintain
Meta Tags feature to create a customized page that search engines
will use instead of searching your entire site.
MAINTAIN URL-REWRITE SETTINGS- Choose to enable URL
Rewrite.
MAINTAIN 301 REDIRECTS- Settings that allows your SiteLINK store to redirect one URL to another URL.
back to top
Reports
NEW ORDERS/CATALOG REQUESTS- Lists orders and catalog requests that
have not been downloaded. This page will allow you to download the files
manually as an alternative to the automatic order download functions in
Mail Order Manager.
ORDERS BY MONTH- View the total number of orders placed on your
site, grouped by month.
REFERRALS BY URL- View a list of sites that are linked to your
site and the number of potential customers that they refer.
SHOPPERS BY DAY- Displays the number of shoppers that land on your
site, grouped by date.
CATALOG REQUESTS- View a list of shoppers who requested
your latest catalog, within the given date range.
EMAIL CAMPAIGN REPORT- Used in conjunction with the Email
Campaign feature, this option will list the number of shoppers that
landed on your site after following the link associated with the selected
Source Key.
VIEW WISH LISTS- Review the list of products entered for a specified
customer's wish list.
VIEW ABANDONED CART CUSTOMERS- View a list of shoppers that started
the Shopping Cart Checkout process, but ended their session and did not
complete the order.
back to top
Miscellaneous
PURGE CUSTOMER DATA- This feature enables you to search for and delete
customer records and corresponding purchasing history on the site
ADD LIVEPERSON CHAT- Using a direct interface with online customer
service chat program LivePerson;
this option enables you to create a Trial Account good for 7 days from
creation. The account is created and automatically linked to your SiteLINK
store. You can then upgrade the account and install the necessary software
through this page.
CREATE EMAIL CAMPAIGN LINK- Generate a link that can be used to track the effectiveness
of an email campaign. After generating the link, it can then be added
to emailed advertisements, thus tracking the customers that make a purchase
after being directed to your site via the email link. The resulting orders
are automatically assigned the selected Source Key, and a list of the
referred customers can be obtained via the Email Campaign Report.
ADD GOOGLE ANALYTICS- Links your SiteLINK store to a Google
Analytics account, enabling you to track visitors, transactions, and
trends all within a user friendly graphical interface.
MAINTAIN CUSTOMER REVIEWS- Check approval queue for pending product reviews. Delete or activate pending reviews or delete/deactivate approved reviews.
MAINTAIN ADDTOANY- Enter JavaScript code to activate social network/sharing through the third party service provided by AddToAny.
MAINTAIN ORDER CONFIRMATION E-MAIL TEXT- Edit the automated order confirmation E-mail that is sent immediately upon completion of an order on your SiteLINK store.
ADD BUYSAFE- buySAFE is a third party service available so SiteLINK users with a 30-day free trial. The service is designed to increase consumer confidence by showing the merchant has been inspected, monitored, and guaranteed by buySAFE resulting in increased website conversions, better customer satisfaction, improved brand loyalty, and expanded profitability.
back to top
Admin Pages
Settings: Account SettingsUPDATE ADMIN PASSWORD- This section allows you to update the password used to log in to your admin page. This password is the same one that is used to publish from your MOM system to your SiteLINK store and to download orders from your SiteLINK store into your MOM system.
UPDATE EMAIL ADDRESS- This section allows you to update the E-mail address that your SiteLINK store will send a forgotten password to.
back to top
Settings: Payment Settings
ACCEPT CC PAYMENTS THROUGH M.O.M. SITELINK GATEWAY- Enabling this option will allow your SiteLINK store to pre-authorize a credit card when entered on an order. The credit card information will then import into M.O.M. where the exact funds will be captured. Note: If this option is disabled, credit card orders can be entered regardless of the validity of the customer's credit card.
ACCEPT E-CHECKS THROUGH M.O.M. / SITELINK GATEWAY- Similar to the credit card option, this option will allow your SiteLINK store to pre-authorize an e-check when entered on an order. The e-check information will then import into M.O.M. where you can then monitor for any negative response codes from your merchant bank before the order will be released. Note: Unlike the credit card option, if this option is disabled the eCheck payment option will not be made available for your customers.
ACCEPT PAYPAL- Enabling this option will allow your SiteLINK store to accept payments through the PayPal Payment System. When the customer selects the PayPal payment option during checkout, the customer will be directed to a PayPal Login screen. Once logged in, the customer must approve the charges from your SiteLINK store. Upon approval, the customer will be redirected to the receipt page, completing the order.
HOLD ORDERS FOR PROCESSING FOR __ DAYS- select a number of days to automatically place PayPal orders on hold when imported into M.O.M. The orders will not process any paperwork until the number of days has been reached.
EMAIL ADDR FOR GATEWAY ERROR NOTIFICATION- The email address entered in this field will receive notifications whenever a Credit Card or eCheck payment fails to receive an authorization from the M.O.M./SiteLINK Payment Gateway due to an error in communication. The affected orders will import into M.O.M. regardless of authorization, the orders will simply be required to run through the entire approval process in M.O.M.
ACCEPT GOOGLE CHECKOUT PAYMENTS- For users with a Google Checkout Account, enter your Merchant ID and Merchant key that you obtained from Google Checkout. Select ACTIVATE ON YOUR SITE to make the payment method available to your shoppers. See the section entitled Setting up Google Checkout Payments for Shoppers in Chapter 3 of the SiteLINK 7.0 Reference Guide
ACCEPT POINTS- This option will allow customers to earn and redeem Points & Rewards that were setup in M.O.M. Points attached to each item can be redeemed on the Basket page when all of the ordered items are listed. M.O.M. Points that are setup in the Global Parameters can be redeemed in the Checkout page.
ACCEPT GIFT CERTIFICATES- Utilizing gift certificate items created in M.O.M., this option gives your customers the ability to redeem Gift Certificate sold in either M.O.M. or your SiteLINK store to also be redeemed on your SiteLINK store.
ACCEPT GIFT CARD- Enable the ability for your consumers to redeem gift cards managed through Valutec. The gift card payment is sent through an online gateway for authorization and is captured in MOM.
back to top
Settings: Cart Checkout Settings
REGISTER/LOGIN BEFORE CHECKOUT- With option selected, customers on your SiteLINK store must create accounts or log into their current accounts before they can create an order.
ENABLE LIVE INVENTORY UPDATE- This option will allow your SiteLINK store to utilize the inventory count received from the last published product information from M.O.M., thus allowing SiteLINK to prevent orders for items that have run out of units available for sale.
DISPLAY SHIPPING METHOD- Options to sort the shipping methods displayed for customers during checkout. Choose to display methods by Shipping Code, Shipping Method Title, or Shipping Cost, in either Ascending or Descending order.
DEFAULT SHIPPING METHOD- Choose a shipping method published from M.O.M. that will be selected by default when a customer runs through the order checkout process.
HIDE SHIPPING METHOD- Select the shipping methods published from M.O.M. that you do not want to be available on your SiteLINK store.
ENABLE SHIP AHEAD- Enable or disable the ship ahead option for orders that have at least one item that is not in stock. MOM will honor the ship ahead flag you select for your SiteLINK even if ship ahead is disabled in MOM.
back to top
Settings: Country Settings
Use this page to select the countries that are available in the country drop-down menus throughout your SiteLINK store. This applies to new customers and prospects only. Your default country is automatically selected and cannot be deselected. You can choose to select/deselect all countries (other than your own countey) or can select/deselect individual countries one at a time. These selections will apply to ALL country drop-down menus throughout your SiteLINK store.
back to top
Settings: State Settings
You may use this page to set state restrictions for orders by choosing which states are available for selection in the State drop-down menus throughout your SiteLINK store. This only applies to new customers and prospects. By default, all states within the United States and Canada are available. You may choose to select or deselect any number of states. After making changes, click the "Save" button at the bottom of the page to preserve your choices.
back to top
Settings: Page Settings
SHOW SIDE NAV ON CHECKOUT PAGES- This option determines if the Left Side Navigation menu that displays the Department and Account Information options, should display in the order checkout pages.
LEFT SIDE NAV- Enter the width (In Pixels) of the Left Side Navigation menu.
COMPANY LOGO- Enter the name of your company logo image.
Simply enter only the image name.. No Path..System will look in the images folder.
Maximum width of logo image should be 670px. Maximum height should be 161px.
(An image larger than these dimensions will be auto-resized accordingly.)
Please note that the height of the logo image will dictate the height of the top header section.
back to top
Settings: Customer Management Settings
ENABLE WISH LIST- This option will keep a wish list of items that the customer specifies for purchase at a later time. The customer can view this list and purchase from it at any time.
ALLOW MULTI SHIP TO- Selecting this option will enable your customers to select different ship-to addresses for each item that they order.
CREATE PROSPECT UPON REGISTRATION- Choose to import a customer's address information as soon as that customer creates an account, even if the customer is not placing an order. The customer's information will import into M.O.M. as a "Customer Prospect."
ENABLE CUSTOMER'S ADDRESS CHANGE- Allow customers who have created accounts in your SiteLINK store, to update their address information. These updates will be imported into M.O.M. and the actual customer record will be updated automatically.
BILL-TO PHONE FIELD REQUIRED- Choose to make the phone number field required for bill-to addresses.
SHIP-TO EMAIL FIELD REQUIRED- Choose to make the E-mail field required for ship-to addresses.
back to top
Settings: Product Search Settings
USE ADVANCED SEARCH- Allow shoppers to utilize the Advanced Search Keywords that were preset in M.O.M. to search for specific products in your SiteLINK store.
SEARCHABLE FIELDS- Select which fields originating from M.O.M. can be used for product searches in your SiteLINK store.
back to top
Settings: Product Display Settings
PRODUCTS PER PAGE- Choose the number of products (50 max.) that appear in each product listing page.
PRODUCT THUMBNAIL SIZE- Enter the size (in pixels) of the thumbnail image that appears next to the product description in the product listing page.
DISPLAY IN STOCK/OUT OF STOCK- Select this option to notify a shopper if an item is currently in inventory from within the individual product page.
DISPLAY DUE DATES FOR OUT OF STOCK- If a product is displayed as out of stock, this option will display the expected date that M.O.M. has calculated based on the Supplier Lead Time setup in M.O.M.
DISPLAY COMPARE AT PRICE- Choose to display the comparative price defined in the Stock Item Maintenance, SiteLINK Tab in M.O.M.
ALLOW BUYING FROM PRODUCT LISTING PAGE- Allow customers to buy a product from the product listing page instead of each individual product page.
ENABLE PRODUCT REVIEWS- Allow customers the ability to review products.
ENABLE RECENTLY VIEWED PRODUCTS- Choose to display up to 5 most recently viewed products to be displayed on the product details page.
DISPLAY MIN/MAX PRICE ON PRODUCT LISTING PAGE- Choose to display the price range for size/color items on the product listing page. If this option is disabled, SiteLINK will display the word 'Options' (list view only) that links to the product detail page for that item. Make sure all size/color variations are assigned to a department in MOM in order to display the correct min/max price range on the site.
DISPLAY PRODUCT SPECIFIC SHIPPING CHARGE ON PRODUCT DETAILS PAGE- For items with a product specific shipping charge, enable this option to display that value.
DISPLAY BEST SELLERS ON HOME PAGE- Choose to display best selling products (titles and thumbnail images) in the right-side navigation of your home page. When enabled, the numbers of products to display can be anywhere from 1-10 products (default is 5).
back to top
Settings: Home Page Featured Products Settings
DEPARTMENT FOR 'FEATURED PROUDUCTS' - Choose the department to be used for the Featured Products to display.
PRODUCT DISPLAY OPTION - Select how the products should display, with a list view, or grid view. If using the grid view, define how many products per grid.
TOTAL PRODUCTS TO DISPLAY - Choose how many products of the selected department to display.
back to top
Settings: Home Page Rotating Banner Settings
Set upto 10 rotating images and optionally link image to page on the site.
To hide rotating images section, uncheck "Un-check to hide Rotating images section from home page" box.
back to top
Settings: Departments
NUMBER OF DEPARTMENTS PER ROW- Enter the number of Departments across the screen (row).
DEPARTMENT THUMBNAIL SIZE- Enter the size of the Department Thumbnail images (in pixels). This is the restriction on the size of the image. Smaller or larger images will be resized to fit this restriction. (Leave this field blank if you do not want SiteLINK to resize the images.)
back to top
Settings: Store Status
Choose to open or close the store for business. A closed store will not allow new orders to be entered.
Please Note: Any shoppers that are currently on the site when the store is closed will be allowed to complete their orders.
back to top
Design: Colors / Buttons Settings
SITE BGCOLOR- Select the color for the background of the pages on your site. Enter the Hexadecimal value of the color you would like to use, or click on the paint bucket icon to select a color.
SITE BGIMAGE- Enter the name of the background image for you store (you do not need to specify a path to the image). The image will tile in the background of your store. The image will be uploaded from the location you specified in the Maintain Store Preferences screen in M.O.M.
BUTTONS- Select the button template you would like to use throughout your site.
back to top
Design: Top Navigation Style
TOP NAV 1- Controls the colors of the text and background color or image of checkout button section.
TOP NAV 2 - Controls the styles for 'shopping cart' section at the top-right of you SiteLINK store.
TOP NAV 3- Controls the styles for the row of links below the banner.
back to top
Design: Side Navigation Style
Controls the colors of the text and background color of the Departments and Account Info menus.
SIDE NAV BACKGROUND COLOR- Controls the color of the background behind the links in each menu.
SIDE NAV TEXT- Controls the color of the text and background of the menu titles.
SIDE NAV LINKS- Controls the color and behavior of the links in each menu.
back to top
Design: Footer Navigation Style
Controls the colors of the text and background color of the Footer column header and links.
FOOTER NAV BACKGROUND COLOR- Controls the color of the background behind the Footer.
FOOTER NAV TEXT- Controls the color of the text and background of the Footer column header and footer text.
FOOTER NAV LINKS- Controls the color and behavior of the Footer links.
back to top
Design: All Page Style
Controls the colors of the text and background of the product listing and individual product pages.
PAGE BACKGROUND COLOR- The background color for the main browsing section of all pages.
PAGE TITLE- The title on all pages except department listing, product listing, product details, specials and static pages.
BREADCRUMB LINKS- The link that appear at the top of the department listing, product listing, product details and specials pages.
TABLE HEADER- Also used on the product details page as the border around 'item number', 'add to cart' box and on the login page as the vertical divider.
ALTERNATING ROW1 COLOR-
ALTERNATING ROW2 COLOR-
ACTIVE LINKS-
TEXT-
PRODUCT TITLE-
PRODUCT TITLE LINK-
PRODUCT PRICE-
COMPARATIVE PRICE-
back to top
Design: Maintain Store Text Pages
Enables you to paste or type in the HTML code for the miscellaneous pages on your site.
FOOTER TEXT- The text entered here will appear at the bottom of every page on your site.
TEXT FOR _____ PAGE- Creates pages where you can enter information about your organization, its policies, procedures, practices, etc. Enter a title for the page and the text or HTML code. The title will automatically create a link in the Top Navigation Bar of your site.
back to top
Marketing: Maintain Meta Tags
Displays a list of Miscellaneous Pages created in the Store Text Maintenance Screen and the departments that originate from M.O.M. Select a Page Title or Department Name to display the Meta Tags fields.
back to top
Marketing: Maintain Robots.txt File
Gives you control over this optional file that resides in the root folder of the website and informs a search engine robot/spider/crawler of what pages should or should not be indexed.
back to top
Marketing: Generate XML Sitemap
The Sitemap feature allows you to create a directory of the pages on your store. This directory is utilized by the Search Engines to read and index the information on your store and subsequently increase your store's prominence on the search engine's result listings.
To create the Sitemap, enter the URL's of the pages on your site excluding department and product pages, to add those pages simply check the boxes below the text field. Click on the Generate Sitemap button.
To Submit your Sitemap, use the links for Google and Yahoo below the Sitemap button and enter the sitemap URL listed on this page to complete your submission.
back to top
Marketing: Maintain URL-Rewrite Settings
ENABLE URL REWRITE- In an effort to create a more "Search Engine Friendly" site, this option changes the way in which the addresses of your web pages are written. By default a specific product page would have a URL that includes the HTML code that is enabling your site to display that specific product, e.g. "http://www.siteLINKstore.com/prodinfo.asp?number=STOCKNO."
The URL Rewrite feature will automatically change that address to "http://www.siteLINKstore.com/STOCKNO/descriptionfrommom." Thus simplifying the address and also utilizing the description that you entered for your product in M.O.M. This greatly increases your chances of a high page ranking on the major search engines by providing unique information for each product sold.
Please Note: All existing links to your site from other web sites will continue to function, the original URL's are still intact so no redirecting is required.
back to top
Marketing: Maintain 301 Redirects
A URL redirect with an HTTP response code of 301 is a permanent redirect, indicating to search engines that the previous URL has permanently moved to the new URL and that the search engine should update its index with the new URL. Any search engine index history or page ranking for the old URL will be retained under the new URL. This is especially useful if moving from a different e-commerce platform to SiteLINK.
Note: Please do not enter domain name in the Old and New URLs.
Sites on its own domain: Enter the part of the URL that comes after your site's domain.
Example: If the site URL is http://www.sitename.com/page.htm, enter 'page.htm'
Sites on a shared domain: Enter the part of the URL that comes after your site URL.
Example: If site URL is http://www.shareddomain.com/sitefolder/page.asp, enter 'page.asp'
back to top
Marketing: Generate SearchSpring Data Feed
Generates product data feed with the products published to SiteLINK site. Please submit this data feed to SearchSpring as the instructions provided by SearchSpring.
back to top
View a List of orders received since the last time that all of the Orders were downloaded into M.O.M. using either the DOWNLOAD NEW ORDERS/CATALOG REQUESTS link, or the Download New Orders feature in Mail Order Manager. Click on an Order Number to view the details of the selected order.
back to top
The CATALOG REQUEST column in the admin page includes more than just catalog requests:
- Catalog Requests: Generated from the inforequest.asp page on the site
- Prospects: Newly registered customers based on the below option
- If the option to Create Prospect Upon Registration is enabled, customers who have registered, but not completed an order will be listed. The record will subsequently be downloaded as a prospect in MOM. This setting can be found under Settings > Customer Management Settings
- If the option is off, only those who have completed an order will be listed there.
- Account Information Updates: Registered customers who have updated their account information
back to top
Reports: Pending Downloadable Product Orders
View a List of orders that has Downloadable products and requires your review/action to be able to download in M.O.M.
back to top
Reports: Orders by Month
Displays a list of the total number of orders and their value separated by month. Click on a specific month to see the total number of orders and their value separated by date. Click on a date to see a list of order numbers and their totals, click on the order number to view the invoice details of that order.
back to top
Reports: Orders by Year
View a summary of the total number of orders taken per year.
back to top
Reports: Referrals by URL
Displays a list of Web Addresses that have brought customers to your store, along with the number of shoppers. Choose a Start and End Date range to filter the report then click on the Get Report button to view the list.
back to top
Reports: Shoppers by Day
Lists the number of visitors to your store by day. Choose a Start and End Date range to filter the report then click on the Get Report button to view the list.
back to top
Reports: Catalog Requests
Displays a list of customers who have requested a catalog on your site, select a name from the list to view the customer's address information. Choose a Start and End Date range to filter the report then click on the Get Report button to view the list.
back to top
Reports: Email Campaign Report
Used in conjunction with the Email Campaign feature, select a source key that is attached to an email campaign then choose a Start and End Date range to filter the report and click on the Get Report button to view the list.
back to top
Reports: View Wish Lists
Use the fields to find a specific customer and view the customer's product wish list. When a customer record is displayed in the list, hover or click on the customer's name to view the list of products on the wish list. Optionally, select customer fields and click the Export Current List button to create an export file of the wish list information.
back to top
Reports: View Abandoned Cart Customers
Use the date fields to view a list of customers who entered their delivery information without completing an order. To export this list, check the box in the Add column next to each customer record then select the appropriate fields and click the Export Current List button to create an export file.
back to top
Reports: View Abandoned Cart Orders
Use the date fields to view a list of customers who entered their delivery information without completing an order and the respective order information. To export this list, check the box in the Add column next to each customer record then select the appropriate fields and click the Export Current List button to create an export file.
back to top
Miscellaneous: Purge Customer Data
Use the Last Name or Email Address fields to find the specific customer record you wish to delete from your SiteLINK Database. When the Customer Records are listed, check records you wish to delete under the Purge column then click the Purge Customers button to permanently delete those records.
back to top
Miscellaneous: Add LivePerson Chat
LivePerson allows you to communicate with your online shoppers in real time, they can either request a chat from any of your pages or you can monitor their activity and send them a chat message if you feel they are having trouble or about to leave your store. This option allows you to create a trial LivePerson account that can be easily converted into a live account. Once an account is created, click on the Installation Wizard button to install the communication software. Click the Buy Now button to convert your Demo Account into a Live Account.
LIVEPERSON ACTIVATION ON YOUR SITE- Choose to enable the LivePerson feature on your site. Once Enabled, a link to start a Live Person chat session will appear throughout your site.
back to top
Miscellaneous: Create Email Campaign Link
This feature used to track which advertisement brought a shopper to your store. You must first enter the page on your site for the shopper to land on then use this screen to assign an Advertising Source Key to that page. Click on the Generate Source Key button to generate a link that includes the specified Advertising Source Key. After generating the link, it can then be added to emailed advertisements, thus tracking the customers that make a purchase after being directed to your site via the email link. This feature is used in conjunction with the Email Campaign Report.
back to top
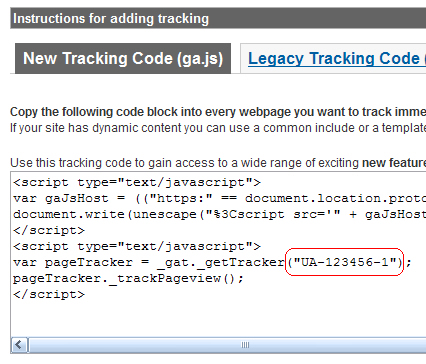
Miscellaneous: Add Google Analytics
Enter your Google Analytics Account information. This will link your SiteLINK store to Google Analytics, allowing you to use their powerful reporting tools to track your site statistics. Your full account number should look something like UA-#######-#.
To find your full Google Analytics account number, log in to your Google Analytics account, click "Edit" (in the Settings column), then click "check status" (see below):
back to top
Miscellaneous: Maintain Customer Reviews
Check approval queue for pending product reviews. Delete or activate pending reviews or delete/deactivate approved reviews.
back to top
Miscellaneous: Maintain AddToAny
Enter JavaScript code to activate social network/sharing through the third party service provided by AddToAny.
To get your AddToAny code please visit www.AddToAny.com, follow their steps to copy your code and paste it in the box below.
***AddThis services have been terminated by Oracle as of May 31, 2023. AddtoAny is a drop-in replacement for AddThis. Click here for the AddToAny blog, Replace AddThis with AddtoAny, the AddThis alternative.
For more information on moving from AddtoAny from Addthis, there is also a guide with specific instructions.
back to top
Miscellaneous: Maintain Order Confirmation E-mail Text
Edit the automated order confirmation E-mail that is sent immediately upon completion of an order on your SiteLINK store. Enter a single from E-mail address that the E-mail is sent on behalf of (required). Enter up to one BCC address to receive a blind copy of the E-mail (optional). Enter the company name (required). Edit the text using plain text only. Do not enter HTML as the confirmation E-mail can be plain text only.
back to top
Miscellaneous: Add buySAFE
buySAFE is a third party service available so SiteLINK users with a 30-day free trial. The service is designed to increase consumer confidence by showing the merchant has been inspected, monitored, and guaranteed by buySAFE resulting in increased website conversions, better customer satisfaction, improved brand loyalty, and expanded profitability.
To sign up for the 30 day trial:
1. Log in to the admin page of your SiteLINK store (ex. www.yourstore.com/admin.asp).
2. Under the Miscellaneous top menu, select Add buySAFE.
3. ClickEnable Free Trial and enter your E-Mail address.
4. Next, under the Settings top menu, select Payment Settings and click yes next to Increase your sales with buySAFE.
5. The buySAFE seal will now be in the bottom-right corner of every page of the site, and on the product detail page
Hint: buySAFE is not a payment method. It is a way to show your customers you are a safe vendor to purchase from.
back to top
Mobile specific settings
Mobile Settings: Mobile Store Status
Enable or disable mobile store template. Mobile devices supported by SiteLINK 7 will display full site or mobile optimized store based on this setting.
back to top
Mobile Settings: Mobile Page Settings
COMPANY LOGO- Enter the name of your company logo image for mobile store.
back to top
Mobile Settings: Mobile Product Display Settings
PRODUCTS PER PAGE- Choose the number of products (50 max.) that appear in each product listing page.
PRODUCT THUMBNAIL SIZE- Enter the size (in pixels) of the thumbnail image that appears next to the product description in the product listing page.
DISPLAY IN STOCK/OUT OF STOCK- Select this option to notify a shopper if an item is currently in inventory from within the individual product page.
DISPLAY DUE DATES FOR OUT OF STOCK- If a product is displayed as out of stock, this option will display the expected date that M.O.M. has calculated based on the Supplier Lead Time setup in M.O.M.
DISPLAY COMPARE AT PRICE- Choose to display the comparative price defined in the Stock Item Maintenance, SiteLINK Tab in M.O.M.
ENABLE PRODUCT REVIEWS- Allow customers the ability to review products.
DISPLAY MIN/MAX PRICE ON PRODUCT LISTING PAGE- Choose to display the price range for size/color items on the product listing page. If this option is disabled, SiteLINK will display the word 'Options' (list view only) that links to the product detail page for that item. Make sure all size/color variations are assigned to a department in MOM in order to display the correct min/max price range on the site.
DISPLAY PRODUCT SPECIFIC SHIPPING CHARGE ON PRODUCT DETAILS PAGE- For items with a product specific shipping charge, enable this option to display that value.
back to top